Good bye, Dennis Ritchie!

Back in the early 1980s I learnt programming in C by reading “Kernighan and Ritchie”, as everyone around me called this book then: “The C programming language” by Brian Kernighan and Dennis Ritchie.

It is no exaggeration to say that C and its derivatives are to computers what hydrogen is to the universe.

Dennis Ritchie, who passed away today at the age of 70, was a co-creator of both the C programming language and of the Unix operating system, after which open source Linux is modelled today. Mac OS X and iOS are direct descendants of Unix (NetBSD), while Android, which runs on millions of smart phones, is based on Linux. Virtually every operating system that matters these days (including all versions of Microsoft Windows) is written in C or C++ or another C-derived language.

Dennis Ritchie may not have become as much of a household name as Steve Jobs, but the software he created probably brought about much more fundamental changes than anything Steve Jobs did, and in fact most of what Jobs created would have been unthinkable without either C or Unix.

See also:

strcpy data corruption on Core i7 with Linux 64bit

If you’re C programmer, does this code look OK to you?

#include <stdio.h>
#include <stdlib.h>
#include <string.h>

int main(int argc, char* argv[])
{
  char szBuffer[80];
  strcpy(szBuffer, "abcdefghijklmnopqrstuvwxyz");
  printf("Before: %s\n", szBuffer);
  strcpy(szBuffer, szBuffer+2);
  printf(" After: **%s\n", szBuffer);

  return 0;
}

Here is the output on my server, a Core i7 running Debian 6:

Before: abcdefghijklmnopqrstuvwxyz
After: **cdefghijklmnopqrstuvwzyz

What the program does is dropping two characters from a text string in a buffer, moving the rest of it left by two characters. You expect the moved characters to stay in sequence, but if you compare the last three characters of the output you see that that isn’t the case. The ‘x’ has been obliterated by a duplicate ‘z’. The code is broken.

It’s a bug, and not a straightforward one, as I’ll explain.

I first came across it a couple of months ago, as I was moving some code of mine from an Athlon 64 Linux server to a new Intel Core i7 server. Subsequently I observed strange corruption in data it produced. I tracked it down to strcpy() calls that looked perfectly innocent to me, but when I recoded them as in-line loops doing the same job the bug went away.

Yesterday I came across the same problem on a CentOS 6 server (also a Core i7, x86_64) and figured out what the problem really was.

Most C programmers are aware that overlapping block moves using strcpy or memcpy can cause problems, but assume they’re OK as long as the destination lies outside (e.g. below) the source block. If you read the small print in the strcpy documentation, it warns that results for overlapping moves are unpredicable, but most of us don’t take that at face value and think we’ll get away with it as long as we observe the above caveat.

That is no longer the case with the current version of the GNU C compiler on 64-bit Linux and the latest CPUs. The current strcpy implementation uses super-fast SSE block operation that only reliably work as expected if the source and destination don’t overlap at all. Depending on alignment and block length they may still work in some cases, but you can’t rely on it any more. The same caveat theoretically applies to memcpy (which is subject to the same warnings and technically very similar), though I haven’t observed the problem with it yet.

If you do need to remove characters from the middle of a NUL terminated char array, instead of strcpy use your own function based on the memmove and strlen library functions, for example something like this:

void myStrCpy(char* d, const char* s)
{
  memmove(d, s, strlen(s)+1);
}
...
  char szBuffer[80];
...
  // remove n characters i characters into the buffer:
  myStrCpy(szBuffer+i, szBuffer+i+n);

I don’t know how much existing code the “optimzed” strcpy library function broke in the name of performance, but I imagine there are many programmers out there that got caught by it like I was.

See also:

Gateway M-6750 with Intel Ultimate-N 6300 under Ubuntu and Vista

My Gateway M-6750 laptop uses a Marvell MC85 wireless card, for which there is no native Linux driver. Previously I got it working with Ubuntu 9.10 using an NDIS driver for Windows XP. Recently I installed Ubuntu 11.04 from scratch on this machine (i.e. wiping the Linux ext4 partition) and consequently lost wireless access again.

Instead of trying to locate, extract and install the XP NDIS driver again, this time I decided to solve the problem in hardware. Intel’s network hardware has good Linux support. I ordered an Intel Centrino Ultimate-N 6300 half-size mini PCIE networking card, which cost me about $35. Here is how I installed it.

Here is a picture of the bottom of the laptop. Remove the three screws on the cover closest to you (the one with a hard disk icon and “miniPCI” written on it) and open the cover. Use a non-magnetic screwdriver because the hard disk is under that cover too. As a matter of caution, use only non-magnetic tools near hard disks or risk losing your data.

Remove the screw that holds the MC85 card in the mini PCI slot on the right. Remove the network card. Carefully unplug the three antenna wires. Connect those wires to the corresponding locations on the Intel card. Insert the Intel card into the socket on the left. Note: I had first tried the Intel card in the socket on the right but in that case it always behaved as if the Wireless On/Off switch was in the Off position, regardless of its actual state. Even rebooting didn’t make it recognize the switch state. The left mini PCI socket did not have this problem 🙂

Because the Intel card is a half size card you will also need a half size to full size miniPCI adapter to be able to screw down the card to secure it. Instead I simply used a stiff piece of cardboard (an old business card) to hold it in place and closed the cover again. If you take your laptop PC on road a lot I recommend doing it properly (don’t sue me if the cardboard trick melts your motherboard or burns down your house).

Download the Intel driver and utility set for Windows from the Intel website using a wired connection. Under Ubuntu the card seemed to work first time I rebooted into it. I just had to connect to the WLAN.

UPDATE:

I fixed it properly using a half size to full size Mini PCI-E (PCI Express) adapter converter bracket by Shenzhen Fenvi Technology Co., Ltd. in Guangdong. I had found it on Alibaba. I paid $9.50 by Paypal and a bit over a week later five sets of brackets and matching screws arrived by mail from Hong Kong (one set is only $1.90 but the minimum order was 5, so that’s what I ordered). The brackets come with about a dozen each of two kinds of screws. Four of the smaller screws worked fine for me.

VIA PC3500 board revives old eMachines PC

Last September one of my desktop machines died and I bought a new Windows 7 machine to replace it. Today I brought it back to life again by transplanting a motherboard from an old case that I had been using as my previous Linux server. The replacement board is a VIA MM3500 (also known as VIA PC3500), with a 1.5 GHz VIA C7 CPU, 2 GB of DDR2 RAM and on-board video. It still has two IDE connectors as well as two SATA connectors, allowing me to use both my old DVD and parallel ATA HD drives, as well as newer high capacity SATA drives.

After the motherboard swap I had to reactivate Windows XP because it detected a major change in hardware. Most of the hardware of the new board worked immediately, I could boot and had Internet access without any reconfiguration. When I started with the new machine. I just had to increase video resolution from the default 640×480 to get some dialogs working.

I then downloaded drivers for the mother board and video from the VIA website. I now have the proper CN896 (Chrome IGP9) video driver working too.

When I tested the board as a server with dual 1 TB drives (RAID1), it was drawing 41W at idle. Running in my eMachines T6212 case with a single PATA hard drive it draws 38W at idle.

Before removing the old motherboard I made a note of all the cable connections on both motherboards. The front-mounted USB ports and card reader have corresponding internal cables, which connected to spare on-board USB connectors. The analog sound connectors connect to the motherboard too. The only port at the front left unconnected was the IEEE-1394 (FireWire / iLink) port, which has no counterpart on the VIA board.

It feels great to have my old, fully configured machine with all its data and applications back thanks to a cheap motherboard that works flawlessly.

Ubuntu 11.4, GA-H67MA-UD2H-B3, EarthWatts EA-380D, Centurion 5 II, 5K3000

CoolerMaster Centurion 5 II

It’s been 2 months since I have written a blog post that wasn’t about the Tohoku earthquake and tsunami or the Fukushima 1 nuclear disaster, but today I am taking a break from those subjects. The reason is that I replaced my local Ubuntu server with newer hardware. The primary requirements were:

  • GNU/Linux (Ubuntu)
  • Reasonably low power usage
  • Large and very reliable storage
  • Affordability

I was considering boards ranging from the new AMD Zacate E-350 dual core to LGA-1155 (“Sandy Bridge”) boards with the Core i5 2500K. First Intel’s P67/H67 chip set problems and then the disaster in Japan prompted me to postpone the purchase.

Finally I picked the GigaByte GA-H67MA-UD2H-B3, a MicroATX board with 4 SIMM slots in conjunction with the Core i3 2100T, a 35W TDP part with dual cores and 4 threads. The boxed version of the Intel chip comes with a basic fan that didn’t sound too noisy to me. I installed two 4 GB DDR3 modules for a total of 8 GB of RAM, with two slots still available. When you install two memory modules on this board you should install them in memory slots of the same colour (either the blue or the white pair) to get the benefit of dual channel.

Gigabyte GA-H67MA-UD2H-B3

I chose a H67 board because of the lower power usage of the on-chip video and the 2100T has the lowest TDP of any Core 2000 chip. I don’t play games and my video needs are like for basic office PCs. Unlike P67 boards, H67 boards can not be overclocked. If you’re a gamer and care more about ultimate performance than power usage you would probably go for a P67 or Q67 board with an i5 2500K or i7 2600K with a discrete video card.

To minimize power use at the wall socket I picked an 80 Plus power supply (PSU), the Antec EarthWatts EA-380D Green. It meets the 80 Plus Bronze standard, which means it converts AC to DC with at least 82% efficiency at 20% load, at least 85% load at 50% load and at least 82% at full load. It’s the lowest capacity 80Plus PSU I could find here. 20% load for a 380W PSU is 76W. Since the standard does not specify the efficiency achieved below 20% of rated output and typically efficiency drops at the lower end, it doesn’t pay to pick an over-sized PSU.

Disk storage is provided by four Hitachi Deskstar 5K3000 drives of 2 TB each (HDS5C3020ALA632). These are SATA 6 Gbps drives, though that was not really a criterium (the 3 Gbps interface is still fast enough for any magnetic disks). I just happened to find them cheaper than the Samsung HD204UI that I was also considering and the drive had good reports from people who had used them for RAID5. The 2TB Deskstar is supposed to draw a little over 4W per drive at idle. I don’t use 7200 rpm drives in my office much because of heat, noise and power usage. Both types that I had considered have three platters of 667 GB each instead of 4 platters of 500 GB in older 2 TB drives: Fewer platters means less electricity and less heat. A three platter 2 TB drive should draw no more power than a 1.5 TB (3×500 TB) drive.

There are “enterprise class” drives designed specifically for RAID, but they cost two to three times more than desktop drives — so much for the “I” in RAID that is supposed to stand for “inexpensive”. These drives support a special error handling mode known as CCTL or TLER which some hardware RAID controllers and Windows require, but apparently the Linux software RAID driver copes fine with cheap desktop drives. The expensive drives also have better seek mechanisms to deal with vibration problems, but at least some of those vibration problems are worse with 7200 rpm drives than the 5400 rpm drives that I tend to buy.

Motherboard, PSU and 4 RAID drives in case

The case I picked was the CoolerMaster Centurion 5 II, which as you can see above is pretty large for a MicroATX board like the GA-H67MA-UD2H-B3, but I wanted enough space for at least 4 hard disks without crowding them in. Most cases that take only MicroATX boards and not full size ATX tend to have less space for internal hard disks or squeeze them in too tightly for good airflow. This case comes with two 12 cm fans and space to install three more 12 or 14 cm fans, not that I would need them. One of these fans blows cool air across the hard disks, which should minimize thermal problems even if you work those disks hard.

One slight complication was that the hard disks in the internal 3 1/4″ slots needed to be installed the opposite way most people expect: You have to take off both covers of the case, then connect power and SATA cables from the rear end (view to bottom of the motherboard) after sliding the drives in from the front side (view to top of motherboard). Once you do that you don’t even need L-shaped SATA cables. I could use the 4 SATA 6 Gbps cables that came with the GigaByte board. Most people expect to be able to install the hard disks just opening the front cover of the case and then run into trouble. It’s not a big deal once you figure it out, but quite irritating until then.

4 RAID drives in case

I installed Ubuntu 11.4, which has just been released, using the AMD64 alternate CD using a USB DVD drive. I configured the space for the /boot file system as a RAID1 with 4 drives and the / file system as a RAID6 with 4 drives with most of the space. Initially I had problems installing Grub as a boot loader after the manual partitioning, but the reason was that I needed to create a “bios_grub” partition on every drive before creating my boot and data RAID partitions.

RAID6 is like RAID5 but with two sets of parity data. Where the smallest RAID5 consists of three drives, a minimal RAID6 has four, with both providing two drives’ worth of net storage space. A degraded RAID6 (i.e. with one dead drive) effectively becomes a RAID5. That avoids nasty surprises that can happen with RAID5 when one of the other disks goes bad during a rebuild of a failed drive. If you order a spare when you purchase a RAID5 set and plan to keep the drive in a drawer until one of the others fails, you might as well go for a RAID6 to start with and gain the extra safety margin from day 1.

I had problems getting the on-board network port to work, so I first used a USB 2.0 network adapter and later installed an Intel Gigabit CT Desktop Adapter (EXPI9301CT). With two network interfaces you can use any Linux machine as a broadband router, there are various pre-configured packets for that.

While the RAID6 array was still syncing (writing checksums computed from data on two drives to two other drives) and therefore keeping all disks and partly the CPU busy the machine was drawing about 58W at the wall socket, as measured by my WattChecker Plus. Later, when the RAID had finished rebuilding and the server was just handling my spam feed traffic, power usage dropped to 52W at the wall socket. That’s about 450 kWh per year.

The total cost for the server with Core i3 2100T, 8 GB DDR3 RAM (1333), H67 MicroATX board, PCIe Ethernet card, 4 x 2 TB SATA drives, case and 380W PSU was just under 80,000 yen including tax, under US$1,000.

The return of the most robust router (WHR-HP-G54 / DD-WRT)

There, I’ve done it: I replaced my fancy new broadband router, a Buffalo WZR-HP-G300NH that supports 802.11n (up to 300 Mbps) with an older model that I had first purchased two years ago, the WHR-HP-G54 (802.11b/g, up to 54 Mbps). Besides supporting the newer, faster, better wireless standard, the newer router had a faster CPU, a USB port and much more RAM and ROM that should make it much more expandable. The trouble was, it was not as robust as the The most robust router I ever used, the WHR-HP-G54. Both routers support DD-WRT and OpenWRT, GNU/Linux-based open source router firmware.

First I had lots of problems with the WZR-HP-G300NH under DD-WRT, which apparently wasn’t ready for prime time on this router yet. The signal was too weak, I couldn’t connect from some parts of the building. Then I switched to OpenWRT and things looked better, but then I kept losing wireless connectivity on all mobile computers and smartphones in the building at random intervals. Only a router reset would allow them to reconnect, there was no other cure. Perhaps that would have been tolerable when it happened once a week, but it seemed to get worse. Finally, after having to reboot the router three times in one day I had enough. I found one supplier that still had stocks of the old WHR-HP-G54 and promptly ordered one.

The new old router arrived two days later. I only briefly accessed it from a PC without a WAN connection as a sanity check, before flashing it with dd-wrt.v24_mini_generic.bin using TFTP and then dd-wrt.v24-10070_crushedhat_4MB.bin using the DD-WRT web interface. I did perform a 30-30-30 reset after the mini flash. After the second flash I restored an NVRAM backup from the previous router of the same type saved back in June from the same firmware. Then I cloned the MAC address of the WAN port of my WZR-HP-G300NH so the latest router could keep on using the same broadband IP acquired via DHCP by its predecessor. After moving the WAN and LAN cables from the old router to the new one, everything just worked, including my ipv6 setup via Hurricane Electric. I just had to connect the wireless clients to the new SSID. Since then I have not reset the router once.

When new versions of DD-WRT and/or OpenWRT come out for the WZR-HP-G300NH I may give it a try again, but more likely I’ll just keep it as spare. I expect my second WHR-HP-G54 to work every bit as well as my first one. I don’t know how much the software was to blame and how much the hardware for the disappointing results with the newer design, but suspect that 802.11n may be too complex for its own good. There has to be a reason why it remained stuck in “Draft N” stage for so long…

I will pick a reliable router like the WHR-HP-G54 running DD-WRT over one that has a more fancy specification any day because reliability is what it takes to get the job done. If you can’t find the WHR-HP-G54, another good basic choice is the WRT54GL that also supports DD-WRT, but unfortunately it is not sold here in Japan and Amazon.com won’t ship it here from the U.S.

See also:

DD-WRT on Buffalo WZR-HP-G300NH (Japanese version, A0 A3)

I’ll be moving to a new house next week, my first move in a decade. To make the switchover as smooth as possible I decided to set up and test the broadband connection and router at the new location ahead of the move, so I’d only have to bring along my PCs and everything should work on the new router that will duplicate the existing setup.

I chose the Buffalo WZR-HP-G300NH because it is supported by DD-WRT, Linux-based open source firmware that I also use on my Buffalo WHR-HP-G54. The new router has 32 MB of flash vs. 4 MB on the old one and 64 MB of RAM vs. 16 on the old one, which will make it much easier to add more features. It also offers 11n with wireless speeds up to 300 Mbps versus up to 54 Mbps on the old router that supports 11b and 11g. One USB-port provides access to mass storage for hosting a website, for audio or video files or for a Samba file server.

Installing DD-WRT was much easier on the Buffalo WZR-HP-G300NH than on its predecessor, as the DD-WRT team offers a special firmware version that can be flashed directly from the firmware upgrade menu of the standard Buffalo firmware. The older router required the use of TFTP for that and the steps involved were more complicated.

Here is what I did:

  • Go to http://dd-wrt.com/site/support/router-database and search for WZR-HP-G300NH. Open the page for this router and download file buffalo_to_ddwrt_webflash-MULTI.bin to the local hard disk.
  • Connect one of the LAN ports of the router via an Ethernet cable to your PC. You can leave the blue WAN port disconnected. Check with ipconfig on Windows or ifconfig on Linux that you receive an IP address like 192.168.11.2. Start your Browser and open http://192.168.11.1/ (enter user name root and leave the password empty).
  • Select the firmware upgrade link on the initial configuration screen or Admin Config / Update in the regular menus. Select local file and browse to the buffalo_to_ddwrt_webflash-MULTI.bin downloaded above. Start the upgrade. This takes about 6 minutes, during which you must not reset or power off the router. When the progress bar reaches 100% and the DIAG LED stops flashing you’re done.
  • Start your browser and open http://192.168.1.1/ — you should see the DD-WRT menus. Assign a new user name and password.
  • Reset the router using the 30/30/30 procedure: Push the reset button at the underside of the router and keep it pushed for a total of 90 seconds. After the first 30 seconds, pull the power cable without releasing reset. After another 30 seconds reconnect power, still holding down reset. After the final 30 seconds release reset. This clears the non-volatile RAM (NVRAM) for a factory reset.
  • Start your browser and again open http://192.168.1.1/ — again assign a new user name and password, which were cleared by the factory reset.

Congratulations! You now have a Buffalo WZR-HP-G300NH running English language open source DD-WRT firmware.

GuruPlug Server and JTAG interface

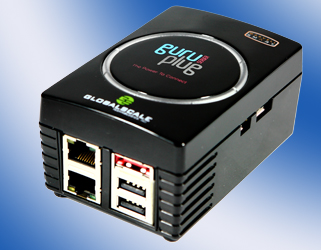
The GuruPlug Server Plus that I ordered from GlobalScale Technologies in February finally arrived around the middle of May, about two weeks later than anticipated.

These ARM-based Linux computers draw a mere 5-6 Watt of power at idle according to my WattChecker Plus, yet provide as much port connectivity as a regular notebook or desktop PC. It’s a full-featured Linux server, provided your application matches the storage available (or or you add enough storage) and integer performance comparable to a Pentium III 800 MHz is adequate for your purpose.

Here’s the specification of the machine:

  • 1.2 Ghz Marvell Kirkwood ARM CPU
  • 512 MB of DDR2 RAM
  • 512 MB of NAND flash
  • two gigabit Ethernet ports
  • 802.11b/g WLAN
  • Bluetooth
  • two hi-speed USB (480 Mbps) ports
  • eSATA port
  • microSDHC slot
  • Debian GNU/Linux 5.0 (2.6.32 kernel)

Normally the GuruPlug boots Linux off its NAND flash (see log below), but it can be reconfigured to load an image from a microsSD / microSDHC card (4 / 8 / 16 GB) and it can also use USB or eSATA disk drives. To reconfigure the boot loader, one needs to access a serial port via a JTAG interface, one of which came bundled with my order but is also available separately. To access this serial port one needs a terminal program such as PuTTY for Windows, a micro-USB cable and drivers for the USB-connected serial port.

If you look at the GuruPlug from the top there will be two tiny sockets on the right, a narrow one with 4 pins for the serial interface and a wider one for the flash interface. Connect these to the JTAG module. Plug the micro-USB cable into the socket at the opposite end of the JTAG module, but don’t connect it to the PC just yet.

Download the FTDI driver .zip file from here into a folder and extract its contents. Modify the two files FTDIBUS.INF and FTDIPORT.INF as described here. (EDIT): Download the FTDI driver archive file from here and save it in a folder. Extract the archive within the archive and unpack it into a folder.

When you finally connect the JTAG module to the PC via the micro-USB cable, it will start the plug and play device detection for it. Windows will not find a matching driver for the two ports (“SheevaPlug JTAGKey FT2232D B”) and so you’ll need to manually chose the location where it may find the driver and INF files (the ones you extracted and edited as above).

If anything goes wrong with the device installation, you can always delete the unrecognized devices in the device manager of Windows and disconnect and reconnect the USB cable to have another try.

Configure the virtual serial port (COM10 in my case) in device manager for 115200 bps. Download and install PuTTY. Then create a PuTTY profile for a connection to the virtual serial port. When you power-cycle the GuruPlug you should see messages come up. Here is a sample of an uninterrupted boot process:

U-Boot 2009.11-rc1-00602-g28a9c08-dirty (Feb 09 2010 – 18:15:21)
Marvell-Plug2L

SoC: Kirkwood 88F6281_A0
DRAM: 512 MB
NAND: 512 MiB
In: serial
Out: serial
Err: serial
Net: egiga0, egiga1
88E1121 Initialized on egiga0
88E1121 Initialized on egiga1
Hit any key to stop autoboot: 0
*** ERROR: `ipaddr’ not set
ping failed; host 192.168.2.1 is not alive
No link on egiga1
*** ERROR: `ipaddr’ not set
ping failed; host 192.168.2.1 is not alive
(Re)start USB…
USB: Register 10011 NbrPorts 1
USB EHCI 1.00
scanning bus for devices… 3 USB Device(s) found
scanning bus for storage devices… Device NOT ready
Request Sense returned 02 3A 00
1 Storage Device(s) found

NAND read: device 0 offset 0x100000, size 0x400000
4194304 bytes read: OK
## Booting kernel from Legacy Image at 06400000 …
Image Name: Linux-2.6.32-00007-g56678ec
Image Type: ARM Linux Kernel Image (uncompressed)
Data Size: 2789756 Bytes = 2.7 MB
Load Address: 00008000
Entry Point: 00008000
Verifying Checksum … OK
Loading Kernel Image … OK
OK

Starting kernel …

Uncompressing Linux…………………………………………………..
…………………………………………………………………………..
…………………………….. done, booting the kernel.
Linux version 2.6.32-00007-g56678ec (root@msi-linux-build.marvell.com) (gcc version 4.1.2 20070925 (Red Hat 4.1.2-33.fa1)) #1 PREEMPT Mon Feb 8 03:49:55 PST 2010
CPU: Feroceon 88FR131 [56251311] revision 1 (ARMv5TE), cr=00053977
CPU: VIVT data cache, VIVT instruction cache
Machine: Marvell Plug2L Reference Board
Memory policy: ECC disabled, Data cache writeback
Built 1 zonelists in Zone order, mobility grouping on. Total pages: 130048
Kernel command line: console=ttyS0,115200 ubi.mtd=2 root=ubi0:rootfs rootfstype=ubifs
PID hash table entries: 2048 (order: 1, 8192 bytes)
Dentry cache hash table entries: 65536 (order: 6, 262144 bytes)
Inode-cache hash table entries: 32768 (order: 5, 131072 bytes)
Memory: 256MB 256MB = 512MB total
Memory: 513024KB available (5144K code, 1034K data, 148K init, 0K highmem)
SLUB: Genslabs=11, HWalign=32, Order=0-3, MinObjects=0, CPUs=1, Nodes=1
Hierarchical RCU implementation.
NR_IRQS:114
Console: colour dummy device 80×30
Calibrating delay loop… 1192.75 BogoMIPS (lpj=5963776)
Mount-cache hash table entries: 512
CPU: Testing write buffer coherency: ok
NET: Registered protocol family 16
Kirkwood: MV88F6281-A1, TCLK=200000000.
Feroceon L2: Cache support initialised.
bio: create slab at 0
vgaarb: loaded
SCSI subsystem initialized
usbcore: registered new interface driver usbfs
usbcore: registered new interface driver hub
usbcore: registered new device driver usb
cfg80211: Using static regulatory domain info
cfg80211: Regulatory domain: US
(start_freq – end_freq @ bandwidth), (max_antenna_gain, max_eirp)
(2402000 KHz – 2472000 KHz @ 40000 KHz), (600 mBi, 2700 mBm)
(5170000 KHz – 5190000 KHz @ 40000 KHz), (600 mBi, 2300 mBm)
(5190000 KHz – 5210000 KHz @ 40000 KHz), (600 mBi, 2300 mBm)
(5210000 KHz – 5230000 KHz @ 40000 KHz), (600 mBi, 2300 mBm)
(5230000 KHz – 5330000 KHz @ 40000 KHz), (600 mBi, 2300 mBm)
(5735000 KHz – 5835000 KHz @ 40000 KHz), (600 mBi, 3000 mBm)
cfg80211: Calling CRDA for country: US
Switching to clocksource orion_clocksource
NET: Registered protocol family 2
IP route cache hash table entries: 4096 (order: 2, 16384 bytes)
TCP established hash table entries: 16384 (order: 5, 131072 bytes)
TCP bind hash table entries: 16384 (order: 4, 65536 bytes)
TCP: Hash tables configured (established 16384 bind 16384)
TCP reno registered
NET: Registered protocol family 1
RPC: Registered udp transport module.
RPC: Registered tcp transport module.
RPC: Registered tcp NFSv4.1 backchannel transport module.
JFFS2 version 2.2. (NAND) © 2001-2006 Red Hat, Inc.
JFS: nTxBlock = 4010, nTxLock = 32080
msgmni has been set to 1002
alg: No test for stdrng (krng)
io scheduler noop registered
io scheduler anticipatory registered
io scheduler deadline registered
io scheduler cfq registered (default)
Serial: 8250/16550 driver, 2 ports, IRQ sharing disabled
serial8250.0: ttyS0 at MMIO 0xf1012000 (irq = 33) is a 16550A
console [ttyS0] enabled
brd: module loaded
loop: module loaded
sata_mv sata_mv.0: version 1.28
sata_mv sata_mv.0: slots 32 ports 1
scsi0 : sata_mv
ata1: SATA max UDMA/133 irq 21
NAND device: Manufacturer ID: 0xec, Chip ID: 0xdc (Samsung NAND 512MiB 3,3V 8-bit)
Scanning device for bad blocks
Bad eraseblock 1265 at 0x000009e20000
Creating 3 MTD partitions on “orion_nand”:
0x000000000000-0x000000100000 : “u-boot”
0x000000100000-0x000000500000 : “uImage”
0x000000500000-0x000020000000 : “root”
UBI: attaching mtd2 to ubi0
UBI: physical eraseblock size: 131072 bytes (128 KiB)
UBI: logical eraseblock size: 129024 bytes
UBI: smallest flash I/O unit: 2048
UBI: sub-page size: 512
UBI: VID header offset: 512 (aligned 512)
UBI: data offset: 2048
ata1: SATA link down (SStatus 0 SControl F300)
UBI warning: ubi_eba_init_scan: cannot reserve enough PEBs for bad PEB handling, reserved 39, need 40
UBI: attached mtd2 to ubi0
UBI: MTD device name: “root”
UBI: MTD device size: 507 MiB
UBI: number of good PEBs: 4055
UBI: number of bad PEBs: 1
UBI: max. allowed volumes: 128
UBI: wear-leveling threshold: 4096
UBI: number of internal volumes: 1
UBI: number of user volumes: 1
UBI: available PEBs: 0
UBI: total number of reserved PEBs: 4055
UBI: number of PEBs reserved for bad PEB handling: 39
UBI: max/mean erase counter: 2/0
UBI: image sequence number: 0
UBI: background thread “ubi_bgt0d” started, PID 454
MV-643xx 10/100/1000 ethernet driver version 1.4
mv643xx_eth smi: probed
net eth0: port 0 with MAC address 00:50:43:01:5c:56
net eth1: port 0 with MAC address 00:50:43:01:5c:57
ehci_hcd: USB 2.0 ‘Enhanced’ Host Controller (EHCI) Driver
orion-ehci orion-ehci.0: Marvell Orion EHCI
orion-ehci orion-ehci.0: new USB bus registered, assigned bus number 1
orion-ehci orion-ehci.0: irq 19, io mem 0xf1050000
orion-ehci orion-ehci.0: USB 2.0 started, EHCI 1.00
usb usb1: configuration #1 chosen from 1 choice
hub 1-0:1.0: USB hub found
hub 1-0:1.0: 1 port detected
Initializing USB Mass Storage driver…
usbcore: registered new interface driver usb-storage
USB Mass Storage support registered.
usbcore: registered new interface driver ums-datafab
usbcore: registered new interface driver ums-freecom
usbcore: registered new interface driver ums-jumpshot
usbcore: registered new interface driver ums-sddr09
usbcore: registered new interface driver ums-sddr55
mice: PS/2 mouse device common for all mice
rtc-mv rtc-mv: rtc core: registered rtc-mv as rtc0
i2c /dev entries driver
cpuidle: using governor ladder
cpuidle: using governor menu
sdhci: Secure Digital Host Controller Interface driver
sdhci: Copyright(c) Pierre Ossman
mmc0: mvsdio driver initialized, lacking card detect (fall back to polling)
Registered led device: plug2l:red:health
Registered led device: plug2l:green:health
Registered led device: plug2l:red:wmode
Registered led device: plug2l:green:wmode
mv_xor_shared mv_xor_shared.0: Marvell shared XOR driver
mv_xor_shared mv_xor_shared.1: Marvell shared XOR driver
mmc0: new high speed SDIO card at address 0001
mv_xor mv_xor.0: Marvell XOR: ( xor cpy )
mv_xor mv_xor.1: Marvell XOR: ( xor fill cpy )
mv_xor mv_xor.2: Marvell XOR: ( xor cpy )
mv_xor mv_xor.3: Marvell XOR: ( xor fill cpy )
usbcore: registered new interface driver usbhid
usbhid: v2.6:USB HID core driver
oprofile: using timer interrupt.
TCP cubic registered
NET: Registered protocol family 17
lib80211: common routines for IEEE802.11 drivers
rtc-mv rtc-mv: setting system clock to 2009-08-08 08:10:20 UTC (1249719020)
usb 1-1: new high speed USB device using orion-ehci and address 2
UBIFS: mounted UBI device 0, volume 0, name “rootfs”
UBIFS: file system size: 516225024 bytes (504126 KiB, 492 MiB, 4001 LEBs)
UBIFS: journal size: 9033728 bytes (8822 KiB, 8 MiB, 71 LEBs)
UBIFS: media format: w4/r0 (latest is w4/r0)
UBIFS: default compressor: zlib
UBIFS: reserved for root: 0 bytes (0 KiB)
VFS: Mounted root (ubifs filesystem) on device 0:13.
Freeing init memory: 148K
usb 1-1: configuration #1 chosen from 1 choice
hub 1-1:1.0: USB hub found
hub 1-1:1.0: 4 ports detected
INIT: version 2.86 booting
usb 1-1.1: new high speed USB device using orion-ehci and address 3
usb 1-1.1: configuration #1 chosen from 1 choice
scsi1 : SCSI emulation for USB Mass Storage devices
Starting the hotplug events dispatcher: udevd.
Synthesizing the initial hotplug events…done.
Waiting for /dev to be fully populated…Bluetooth: Core ver 2.15
NET: Registered protocol family 31
Bluetooth: HCI device and connection manager initialized
Bluetooth: HCI socket layer initialized
libertas_sdio: Libertas SDIO driver
libertas_sdio: Copyright Pierre Ossman
libertas_sdio mmc0:0001:1: firmware: requesting sd8688_helper.bin
libertas: can’t load helper firmware
libertas: failed to load helper firmware
libertas_sdio: probe of mmc0:0001:1 failed with error -2
Bluetooth: vendor=0x2df, device=0x9105, class=255, fn=2
btmrvl_sdio mmc0:0001:2: firmware: requesting sd8688_helper.bin
btmrvl_sdio_download_helper: request_firmware(helper) failed, error code = -2
btmrvl_sdio_download_fw: Failed to download helper!
btmrvl_sdio_probe: Downloading firmware failed!
done.
Setting the system clock.
Activating swap…done.
Setting the system clock.
scsi 1:0:0:0: Direct-Access Generic STORAGE DEVICE 9909 PQ: 0 ANSI: 0
sd 1:0:0:0: Attached scsi generic sg0 type 0
sd 1:0:0:0: [sda] Attached SCSI removable disk
scsi 1:0:0:1: Direct-Access Generic STORAGE DEVICE 9909 PQ: 0 ANSI: 0
sd 1:0:0:1: Attached scsi generic sg1 type 0
sd 1:0:0:1: [sdb] 7954432 512-byte logical blocks: (4.07 GB/3.79 GiB)
sd 1:0:0:1: [sdb] Write Protect is off
sd 1:0:0:1: [sdb] Assuming drive cache: write through
sdb: sdb1
sd 1:0:0:1: [sdb] Assuming drive cache: write through
sd 1:0:0:1: [sdb] Attached SCSI removable disk
Cleaning up ifupdown….
Loading kernel modules…done.
Checking file systems…fsck 1.41.3 (12-Oct-2008)
done.
Setting kernel variables (/etc/sysctl.conf)…done.
Mounting local filesystems…done.
Activating swapfile swap…done.
Setting up networking….
Configuring network interfaces…done.
Starting portmap daemon….
Setting console screen modes and fonts.
cannot (un)set powersave mode
Setting up ALSA…done (none loaded).
INIT: Entering runlevel: 2
Starting enhanced syslogd: rsyslogd.
Starting system message bus: dbus.
Starting OpenBSD Secure Shell server: sshdNET: Registered protocol family 10
.
Starting MySQL database server: mysqld.
Checking for corrupt, not cleanly closed and upgrade needing tables..
Starting MTA: exim4.
ALERT: exim paniclog /var/log/exim4/paniclog has non-zero size, mail system possibly broken failed!
Starting Network Interface Plugging Daemon:ADDRCONF(NETDEV_UP): eth0: link is not ready
eth0.
Starting web server: lighttpd.
Starting internet superserver: inetd.
Starting Samba daemons: nmbdeth0: link up, 100 Mb/s, full duplex, flow control disabled
ADDRCONF(NETDEV_CHANGE): eth0: link becomes ready
smbd.
Starting file alteration monitor: FAM.
Starting Hardware abstraction layer: hald.
Starting periodic command scheduler: crond.
Sat Aug 8 08:08:00 UTC 2009
uap_probe: vendor=0x02DF device=0x9104 class=0 function=1
uap_sdio mmc0:0001:1: firmware: requesting mrvl/helper_sd.bin
uap_sdio mmc0:0001:1: firmware: requesting mrvl/sd8688_ap.bin
UAP FW is active
ADDRCONF(NETDEV_UP): uap0: link is not ready
SSID setting successful
BSS started!
ip_tables: (C) 2000-2006 Netfilter Core Team
nf_conntrack version 0.5.0 (8022 buckets, 32088 max)
CONFIG_NF_CT_ACCT is deprecated and will be removed soon. Please use
nf_conntrack.acct=1 kernel parameter, acct=1 nf_conntrack module option or
sysctl net.netfilter.nf_conntrack_acct=1 to enable it.
Starting very small DHCP server: udhcpd (v0.9.9-pre) started
udhcpd.
Starting DNS forwarder and DHCP server: dnsmasq.
Starting bluetooth: bluetoothdBluetooth: L2CAP ver 2.14
Bluetooth: L2CAP socket layer initialized
Bluetooth: RFCOMM TTY layer initialized
Bluetooth: RFCOMM socket layer initialized
Bluetooth: RFCOMM ver 1.11
.
Bluetooth: BNEP (Ethernet Emulation) ver 1.3
Bluetooth: vendor=0x2df, device=0x9105, class=255, fn=2
Bridge firewalling registered
Bluetooth: SCO (Voice Link) ver 0.6
Bluetooth: SCO socket layer initialized
Agent registered

Debian GNU/Linux 5.0 sheevaplug-debian ttyS0

sheevaplug-debian login:

The initial admin password for user “root” is “nosoup4u”. Change this as soon as you can to something different.

By default the Plug acts as a broadband access point. Join the GuruPlug WLAN from a laptop and you’ll get an IP address in the 192.168.1.100-192.168.1.200 range. You can access a simple website at htpp://192.168.1.100:80 to learn more about the GuruPlug settings.

http://plugcomputer.org/ is a great resource for finding more information about setting up your GuruPlug.

GuruPlug Server Plus, a $129 Linux server based on ARM

GuruPlug Server Plus

Over the years, Intel and its microprocessors have become a household name, recognized by millions of PC users. However, far more people own computers based on ARM processors without ever having heard of that CPU – it’s their mobile phones. More than a billion mobile phones are sold worldwide every year, each one more powerful than an office computer that used to run Windows 95/98 not too long ago. Whatever the brand or model, almost all of them (98%) use at least one CPU based on the ARM architecture. Also, if you own a car navigation system or a broadband router that connects your PC to a DSL or cable modem, it probably uses an ARM chip. Do your kids own a Gameboy Advance, a Nintendo DS, do you listen to music on an iPod? ARM CPUs are common to all of these, as well as the iPhone, the Blackberry and other mobile phones.

From the start, ARM was meant to compete head-on with Intel CPUs in desktop computers, but for many years there really was no direct competition between the two. The issue was mostly software, and as that may change, we’ll increasingly see ARM and Intel compete directly in the same markets. This is bad news for Intel (and AMD) as per-CPU revenue has been far higher in their markets than for makers of ARM chips. As Intel is trying to get a bigger slice of the exploding handheld market with Atom while ARM is taking a bite out of Intel-dominated markets, this gap in pricing is set to erode.

A short history of ARM

ARM has a colourful history. The first ARM chips were developed by Acorn Computers Ltd in Cambridge/UK, who in the early 1980s had successfully launched the 6502-based BBC Micro home/educational computer, an 8-bit machine. I first visited Acorn in the summer of 1984 as a young software engineer working at Digital Research UK. Under an OEM contract I ported Concurrent DOS to a prototype Acorn ABC 310, a 6502-based machine with an 8 MHz 80286 second processor equipped with 1 MB of memory. That 286 machine was one of several projects meant to take Acorn into the more lucrative business market, using a range of 16-bit and 32-bit machines to compete against the likes of the new IBM PC/XT, PC/AT and the 8086-based ACT Apricot that was very successful in the UK. Acorn was well aware of the limitations of the 6502, which was only an 8-bit processor that could not address more than 64 KB of memory. Acorn then decided to replace the 6502 with a simple but efficient 32-bit RISC design, the Acorn RISC Machine (ARM) which came out in 1986.

As it turned out, machines based on ARM never took much market share from the new IBM-compatible PCs that were gradually taking over the desktop market. So instead of building entire computers, or making chips and selling them like Intel does, the developers of ARM decided to license the design to anyone wishing to integrate it into their own custom designs. That’s how ARM became both ubiquitous and nameless. One reason for the lack of success on the desktop was the huge library of software written for MS-DOS and later the various MS Windows versions, which only worked on Intel-compatible CPUs. Despite that, the ARM design eventually became successful beyond anybody’s wildest dreams in mobile and embedded markets where low power usage and low cost were crucial. Mobile phones and other handheld devices and appliances had no need to run desktop applications written for MS Windows. Subsequently, ARM as a hardware platform became so successful that Microsoft ported its Windows CE operating system to ARM (besides x86, MIPS and SuperH as other supported platforms). Even Intel was involved for 8 years with StrongARM and XScale, which it sold to Marvell in 2006.

The marriage of ARM and Open Source

Now it looks like ARM is returning to its roots, with the announcement of ARM-based netbooks and with ARM-based Linux servers. Until recently notebooks and servers were mostly Intel domains, but open source and portable Linux is bridging the gap between Intel and ARM hardware, leveling the playing field for applications. In early 2009 Marvell launched the SheevaPlug, a $99 self-contained ARM and Linux-based mini-server about the size of a notebook power brick. A year later, Globalscale Technologies announced the GuruPlug range of low cost, energy saving computers as the successor to the SheevaPlug; both SheevaPlug and GuruPlug are based on a Marvell chip set, with similar specs and sizes. The GuruPlug is 95mm (L) x 65mm (W) x 48.5 mm (H) and draws under 5 Watts. Its built-in universal power supply handles 100-240V, 50/60Hz for worldwide use with only a plug adapter. The GuruPlug is supposed to start shipping in April and I have two on order 🙂

The most interesting of the three GuruPlug Server models in my opinion is the “Plus” model, which sells for $129, $30 more than the GuruPlug Server “Standard” model or the older SheevaPlug base model. All GuruPlug Server models sport a 1.2 Ghz Marvell Kirkwood ARM CPU, 512 MB of DDR2 RAM, 512 MB of NAND flash, 802.11b/g WLAN and Bluetooth. While the Standard model offers one gigabit Ethernet port and one hi-speed USB (480 Mbps) port, the Plus has two of each and also offers an eSATA port (3 Gbps) plus an external micro-SD slot.

Dual network interfaces make the Plus very suitable as a router (one port for the WAN, one for the LAN). Just add a 4-port hub and you have a direct replacement for a regular broadband router, but with the ability to also hook up USB or eSATA hard disks for Network Attached Storage (NAS) or as a web server or media server, or plug in a USB-printer to be shared over the LAN. Or you could run a VPN, or a mail server, or a spam filter – or all of these combined. Basically anything that works on a Linux server should work in this tiny box, as long as there is enough storage for files on either the internal flash or RAM or the micro-SD or a USB-stick or an external USB or eSATA hard disk.

A third model, the GuruPlug Display for $179 has also been announced, but (as of 2010-02-21) can not be ordered yet. This one will come with 3 USB ports and an HDMI video connector for hooking up an external monitor, so you could use it with a keyboard and mouse (via USB or Bluetooth) for web browsing.

The most robust router I ever used – WHR-HP-G54 (DD-WRT)

It’s been 15 months since I set up a Buffalo WHR-HP-G54 with open source Linux-based DD-WRT firmware as my main broadband router (see “DD-WRT on Buffalo WHR-HP-G54”, 2008-09-06). I’m happy to report that this US$70 router it is the most robust router I have ever used. Its performance has been solid as a rock.

I’ve owned other routers that would occasionally need resetting because of connection problems, or that would spontaneously reboot themselves, but not the WHR-HP-G54. It never misses a beat.

Currently, its uptime count is at 157 days, that is since a family member accidentally pulled its power cord out of the wall socket five months ago. This box will stay up and running forever, no matter how hard you push it. It works better than any other router I’ve owned at any price.

In five months my router has handled a total of 1080 GB (1.08 TB) of data that either came from or went out to the cable modem, or over 6 GB per day (I process a lot of spam data and have 4 hard disks of 1 TB or larger).

On top of all the regular functions of a home / small office router it handles IPv6 tunneling over IPv4 and offers many features. The user interface is straightforward, yet very powerful.

A friend of mine who used to have chronic problems with two different routers, which he uses with about 10 different computers in his home, on my recommendation bought the same model several months ago. He thanked me again today because he hasn’t had any problems since 🙂